 Zen Planner has a powerful auto-emailer, and although it's not perfect - it is THE BEST one native to a fitness or martial arts crm app that I've found. Below are the tips that I train my staff to follow when creating automatic emails in Zen Planner.
1) Sketch out your Dream Automation
This may seem obvious, but don't start any work until you know that an automation is possible. Draw it out on paper and really know what the requirements would have to be for such a process to work.
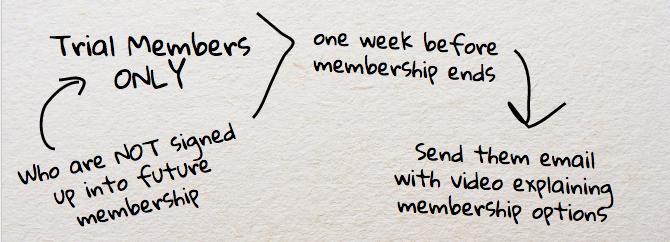
Real world example: I want to send an automatic email to everyone who's trial membership is about to expire in order to remind them about their options are for upgrading into a full program. The first thing I do is sketch it out like this:
2) Find out if your Automation is possible
Once you've figured out what you want, start clicking around to see if your necessary options are available. Do this by either reaching out to Zen Planner's Help Desk, or by playing around in Zen Planner like I do. To do this, go to Automations > Add an Automation - and then select different types of automations to see what filters they have available.

3) Compose your Email Template outside of Zen Planner
Not too long ago, I was composing an email template in Zen Planner, when all of a sudden the phone rang and distracted me. When I came back to finish the email, it had vanished. Zen Planner is notorious for being PCI compliant to a fault, because it logs you out after 10 minutes of inactivity.

If you're like me (a wannabe multitasker), you may forget to save your email along the way and lose it before it's finished. Don't let this happen to you. Write your email somewhere else (ie Google Docs, or Notepad) and then copy/paste it back into Zen Planner when you're good and ready.
Note: Backups are ALWAYS a good idea.
4) Use Tags to personalize your Automatic Email
Even if your email is going to be obviously automatic (such as a reminder email), it's a nice touch to add things like the person's first name, or some relevant piece of information.

5) Test the Automation
Trust me: you don't want to enable an automation without testing it first. I can tell you from experience that it's no fun to respond back to 30 people who are really confused about the email that you just sent them. Or even worse, to setup an improperly configured automation for a long period of time.
One way to test your automation is to target a specific person who you absolutely know will qualify for one for one of your automatic emails. Set it up and check back the next day to see if the person was sent anything (do this by checking the email history or the notes on his/her profile).
Note: Remember that automations get sent out both when the criteria is met AND when the system gets around to sending it. Zen Planner's servers are running a lot of automations, so there may be a few hours lag time between when the action is queued and when it is executed.
No comments :
Post a Comment